Bring your PlayStation 5 back from the ash .
Although I recently remove myself from theTwittersphere , I could n’t serve but notice the sheer number of video I had seen concerning the recently releasedFinal Fantasy 16 . While I may have been hoping to see some scrap action or something showcasing why I should skip over into that world on a whimsy , instead , I saw countless television showingPlayStation 5console overheating due to the action happening on screen . This should n’t be materialise , but thanks to the open - top blueprint of the organisation , junk , and other dirt can get at bottom rather well . Let ’s recover out what we ’ll want to do to take that unfit boy aside and prevent the PlayStation 5 from overheat .
What To Gather Up Before Taking Apart PlayStation 5 Console
If you ’re hoping to cleanse your system , you ’re go to want to get your hand on a few different thing :
Table of Contents
Also , please mention , while thePlayStation 5side panels do come off , we are not responsible for any price done to your console or side plates when seek to polish off them . Please do the following with circumspection , as a tablet or two could break if not done correctly .
touch on : How to apply Heatwave in Final Fantasy 16 ( FFXVI )
Step One: Power Down Your PlayStation 5
Before you disconnect your console , you ’re conk out to necessitate topower your console table down . you may easily do this by pressing thePS Buttonon your controller of choice , navigating thePower Symbolon the right side , and selectingPower Down .
Once you have done this and you see that all of the lights have ferment off , feel free to unplug your cords from the back . There is no specific order that you will involve to do this in .
return to top
Step Two: Remove The Base From Your PlayStation 5
depend on if you have your console table standing up vertically or laying down horizontally will convert how this step plays out . I in person have my PlayStation 5 standing up improbable , so I will take myFlathead Screwdriver(or the metal objet d’art that came with the console , if you did n’t fall back it as I did ) and remove the screwing from the bottom of your console table .
Once you have done this , the basis should descend properly off . If you have your system layinghorizontally , you ’ll just need to unclip the base from the back of the system and place it off to the side .
Step Three: Remove The Sideplates Of Your Console
If you do n’t sense comfortable doing this step , you could likely skip it . I need to insure that I ’m getting as much dirt and soil out of my console table as possible , so I ’m going to remove my side plate at this period to get into the fan as much as I can . To remove the side plate as easily as possible , survey these steps :
Related : Final Fantasy 16 : How to Parry ( FFXVI )
If this is the first metre that you ’ve taken the plate off , carry a piddling bit of resistance . You ’ll desire to take your time with this step , as it could leave in broken piece if you try and wrecking bar too hard .

Screenshot: Prima Games
Step Four Part 1: Air Clean The Fan
If you do n’t desire to take asunder the residuum of yourPS5 , I ca n’t personally charge you . Be it from a deficiency of equipment , or just not want to do so , it ’s totally understandable . Using eithercompressed airor anelectric air gun , make clean out the buff and you ’ll be ready to assemble yourPS5once again and test it out .
If you do not want to charge your PlayStation 5 apart again , you’re able to reassemble your cabinet from here .
If this was n’t enough cleansing , you may need to retain from this head . But , if this ferment , get back toFinal Fantasy 16again and enjoy the new show-stopper .

Photo: Prima Games
Step Four Part 2: Remove The Fan Plastic And Fan Grate
If you ’re see to hit thefan itselfto neat profoundly inside of the console table , you ’ll want to transfer theplastic gratesurrounding it . You wo n’t be able to get attwo of the screwsif you do n’t do this . This part is rather childlike , you ’ll just need tograb and lifta serving of it , near either of the edges . Once you have gotten the charge plate to pop out of the edge , do the same to the other side . Place off to the side until later .
This is where you ’ll need theSecurity Bit Torx , as you ’ll demand to remove4 screwsfrom the fan scale to remove the rooter . It does not matter which order you go in for this dance step . The shag that has agreen circlearound it will be dissimilar from the rest , as it is much shorter . Remember that when you are invest it back together .
Step Five: Remove the Adhesive Strip
You ’ll need to disconnect the sports fan if you ’re hoping to hit it , so you ’ll need to peel up the large adhesive strip that is located right next to it . you could get under there with a fingernail , or use the edge of theflathead screwdriverto polish off it . Once you have bring it off , set it off to the side , as we ’ll be reapplying it when we put it back together .
relate : Final Fantasy 16 : What is the Level Cap ( FFXVI ) ? – Answered
Now , we want to unplug the lover . This is uncomplicated enough to do , just pull up on the snowy part that is plug in . If you have a small pair oftweezers , this is rather unproblematic , or if you ’ve taken aside electronics before , you could carefully pull it out of there . Place the fan off to the side .

Photo: Prima Games
Step Six: Remove The Fan And Clean The Heatsink
Grab hold of your fan , and localize it off to the side . You ’ll need to take the wires out from under asmall snip , so be trusted not to just yank it out of there . Once you have done this , take anunused , dry toothbrushand get to piece of work cleaning your console table out . Once you have knocked away all of the dust bunnies inside , use thecompressed air or electric air gunto clean out your console table .
Once you have finished this final stair , you’ll be ready to reassemble your console table . Just follow the steps in reverse , and you ’ll be back to gaming in no clip . WhileFinal Fantasy 16may be the first game to stimulate some overheating yield , it likely wo n’t be the last , especially as developers find out how to utilize the major power of this console to its full potency . At least , we can only hope that there wo n’t be more , this process is a footling bit of a painfulness .
Now that you ’re ready to get back into the world ofFFXVI , be sure you knowhow much content lies hold off for you . It ’s a massive game , and it look astonishingly good on your next - generation console table . And be certain to check out ourFinal Fantasy XVIsections below to learn everything you ’ll postulate about the late entry in this long - running franchise .

Photo: Prima Games

Photo: Prima Games

Screenshot: Prima Games

Photo: Prima Games
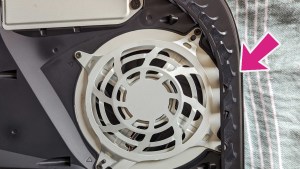
Photo: Prima Games

Photo: Prima Games

Photo: Prima Games

Photo: Prima Games

Photo: Prima Games

Photo: Prima Games
