Where the beshrew go to get a little disobedient
Some aspects are simply dependable than others . And there are few aspects as utile as the Aspect of Disobedience , which can make even spongy Sorcerers playable . To that closing , here ’s how to find the Halls of the Damned in Diablo 4 .
How to Get the Aspect of Disobedience in Diablo 4
There are over 150 dungeons in Diablo 4 , each boast its own unique Aspect . And while it ’s possible to get those Aspects from random power train , it ’s much more effective to just harness the keep they ’re associated with . For the Aspect of Disobedience , that dungeon is the Halls of the Damned . And it ’s not even that unvoiced to regain .
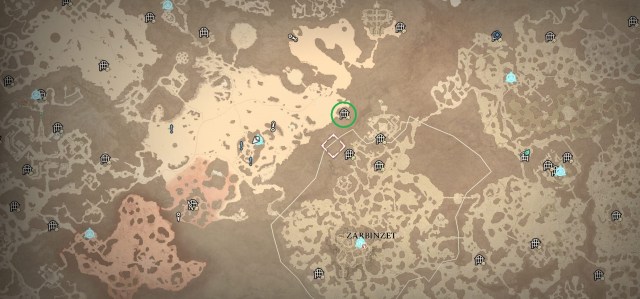
The Halls of the Damned is in Kehjistan , Scouring Sands . The closest Waypoint is Tarsark . But if you ’ve just pop out a new lineament , it ’s likely you have Zarbinzet unlocked . This major Hawezar metropolis is also very snug to the keep .
From either Waypoint , chief to the Scouring Sands and keep right along the drop-off wall . Eventually , you ’ll find the dungeon entrance , usually dead clotted with monster .

Completing the Halls of the Damned in Diablo 4
While the Halls of the Damned might be well-situated to find , completing it can be a bit of a slog . It ’s a enceinte donjon that ’s dominant with ghost , Phantoms , and skeleton in one department and full of Marauders and Master - at - weapon system in the other . You ’ll also be using teleporters to leap between these two sections .
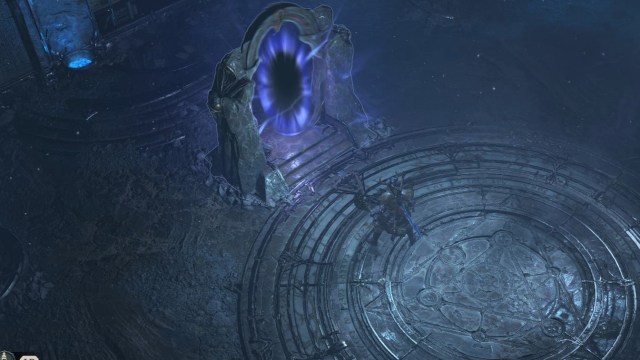
To access theSeaborn Goddess , you ’ll need to form your room through the main dungeon until you find a Teleporter .
Go through it , and you may happen yourself in a dark donjon full of Vileblood , Marauders , and Master - at - sleeve . These are all enemy link with the coastal area .
Screenshots by Prima Games
Continue through this offshoot floor and you ’ll see the Seaborn Goddess Statue . destruct the Seaborn Goddess Statue and you ’ll be sieged by wave of enemies and the Elite foe Ethewlin Doomspawn . You do n’t technically need to vote down this Elite , but he ’ll likely strike down loot .
Ethewlin Doomspawn comes with modifier gene ( mine had Summoner ) . If you ’re struggling to defeat him , remember to run when he lifts the mast . When he lift the mast , he ’s using an domain - of - essence attack that will summon a wave of body of water , and it ’s well his most sinewy move .
Once the Seaborn Statue is work , regress through the teleporter to come back to the chief dungeon map and locate the second teleporter . The second teleporter is probable on the diametric side of the dungeon .
Screenshots by Prima Games
To access theOverseer , you ’ll require to operate your way through the principal dungeon until you find the second teleporter . Once at heart , you ’ll find yourself fighting Vile Ones , Vile Overseers , and Vile Shaman . Which makes sense , as we ’re here to destroy an Overseer statue . This section is exactly the same as the Seaborn Goddess subdivision , so work your way through the light corridor until you find the Overseer statue .
Once you find the statue , you ’ll be swarmed with enemies . Destroy the statue , and you ’ll be attacked by the elect enemy Rakoshan Pusblister . As his name entail , he has a Poison enchantment .
When both statues are destroyed , you ’ll get your next task .
With the statue destroy , a unripe barrier in the main dungeon will have been dispelled . Return to the main dungeon and locate the room access that is now open . You ’ll be lock in a room with four pillar , which you ’ll need to destroy . skeletal frame will continuously set on you until you do . Once all the pillars and skeletons are gone , you ’ll be able to get to the 2nd one-half of the dungeon .
fortuitously , you do n’t have to go far . The Sepulchrum is actually the knob room .
Inside the Sepulchrum , you ’ll find a Monolith with two statues holding cerise orbs in front of it . Interact with the Monolith to set out the hirer fight against the Tomb Lord .
Related : How to Prepare for World Tier 4 in Diablo 4
How to Defeat the Tomb Lord in Diablo 4
Tomb Lord might be one of the easiest bosses in the plot , as he’sextremelypassive . He has two primary movement : mobilize whirlwind and summoning bone paries .
When the Tomb Lord summons whirlwind , he ’ll muster up three total . These whirlwinds stay stationary where they ’re summoned . Standing in them will limit your vision and daze you . I highly recommend not stand in them .
The 2nd move Tomb Lord uses is summoning Bone Walls . This is where most of his hurt comes from . These Bone Walls will probably be used to compose you in . Once this chance , you ’ll have a limited amount of prison term to break those walls and safety valve , or the Tomb Lord will raise his stave and cause them to explode for damage . Not a significant amount of equipment casualty , but damage .
Otherwise , the Tomb Lord just be adrift passively along , not doing much to either evade or attack you . Whittle off his wellness and you ’ll earn some loot . But most crucial , the Aspect of Disobedience .
Now that you have one of the good Aspects in the plot , you might be wonder what else there is . Check out the full compendium here : All Aspects in Diablo 4 Listed – Codex of Power .
