Find out how to trade your SSD in no time !
If you ’re one of the many that take place to have a 64 GB Steam Deck , you know the immediate pain of want to install a new game , only to find out that you ’ve already be given out of storage . While the Nintendo Switch can get away with a 32 GB and 64 GB Model , it feel almost felonious to have a Steam Deck with this depression of full computer memory . Thankfully,2230 SSDsare coming down in price rather rapidly , so what better path to spend your good afternoon thanswapping out your SSDin your Steam Deck ? permit ’s get into the teardown and discover out what we take to make this happen .
Tools Of The Trade: What Do You Need To Swap An SSD In A Steam Deck
If you ’re hop to take a crack at it , you ’re going to ask a few tools :
Now that you ’ve get everything ready and in front of you , countenance ’s get into it . Also , please note the following :
If you have a Micro SD carte in your Steam Deck , remove it before starting this operation , or it may snap in one-half . Also , power down your Steam Deck before continuing further . Prima Games is not responsible for any damage done to your Steam Deck / Accessories during this outgrowth . Proceed at your own risk .

Step One: Remove The Back Cover Of The Steam Deck
The first thing you ’ll postulate to do is place yourSteam Deckface down in the carrying case andremove the eight screwsin the back of theSteam Deck . In the picture above , short screwsare circle with aRed Circle , andlong screwsare circled with aBlue Circle . After you have removed every piece of ass , it ’s clock time to start prying it subject .
This is where theCredit Card / Plastic Pry Toolwill come in handy . Starting up near theTriggers , you ’ll want to wedge your prying cock of choice into the crack between the back and front and set about pry it apart . It ’s get going to be a struggle at first , but as soon as the hold loose up , the back becomes much easier to take out off .
interrelate : Can you Play Honkai Star Rail on Steam Deck ? – Answered
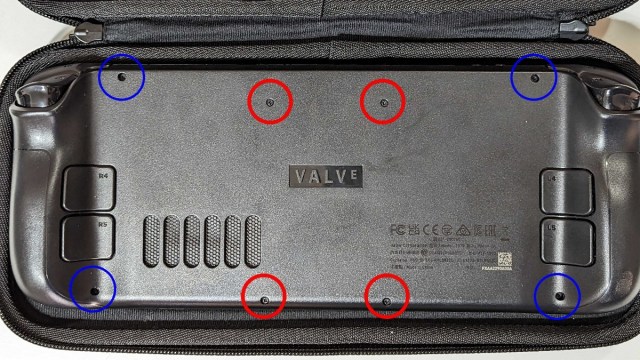
Photo: Prima Games
If you ’ve taken the back off before , you may be able-bodied to use afingernailto pop this subject but do n’t attempt it if you do n’t need to damage your nail . The credit card is tougher than you may anticipate , so only do this if you ’ve learn it aside before .
Step Two: Peel Back The Foil And Remove The Screw
To get this operation start , you ’ll need to remove the metalheat shieldthat also double as a bit of shelter over some of the more delicate wire . Peel back the modest foil piece that is near the top , and unscrew the screw beneath it . There are two more screws located on the side of this cuticle that you need to remove before you may go forward forward .
Step Three: Remove The Shield Side Screws In Your Steam Deck
At thetop leftandbottom leftof this shield , you ’ll notice two tiny screw , outlined with a red circuit once again . Remove the two of these , and the shell will pop powerful off . If you ’re deliberate when removing it , you may be able to keep them in the small holes , give you the chance to plunk down them the right way back into the holes during reassembly .
You may also be wondering why thetop right and bottom rightscrew holes have nothing in them . I learned the punishing path while reassemble mySteam Deckafter take picture of this tutorial that thebackplate screwsgo directly into those two spots . I thought I lose a piece of ass from the last time I take it asunder , but quickly get wind that they ’re have in mind to be empty .
pertain : How to optimise Battery Life on Steam Deck ? – Answered

Photo: Prima Games
Step Four: Remove The Battery Wire From Your Steam Deck
This is by far the most slow and hard part of the disassembly operation , but also one of the most of import steps . You ’ll want todisconnect the batteryfrom the chief plug-in to avoidhot - trade your SSD . What ishot swapping , you may postulate ? Well , it ’s exchange parts while there is still power move to the board , so even if you have yourSteam Deckturned off , you could still fry theSSD , and that ’s not a risk we desire to take . Do not pull directly on the telegram , you ’ll want to utilize the small-scale pliers or pincer to try and wrecking bar from either thesidesof the black plastic or promote from the top sass .
Once you have unplugged your battery , pressure and declare the business leader button for 10 - 15 moment to unload the gadget . This ensures there is no power flow through the instrument panel , efficaciously minimizing any peril of electrocute part .
Now that you have the battery taken out , we ’re already onto the last step of this unconscious process ! Time flies when you ’re having playfulness , does n’t it ?

Photo: Prima Games
Step Five: Remove And Replace The SSD From Your Steam Deck
At the oddment of theSSD , there will be a smallscrewthat you postulate to remove to admission theSSD . Take this jailer out and set it off to the side . You ’ll notice that theSSDwill pop up , gift you a chance to tear it out of the socket . get rid of it , and take off theheat shieldthat is plow it . you could eitherpeel it apartandstick it backonto the newSSD , or joggle theSSDout of it and drive the new one in . Personally , I unwrapped mine and went from there , as it was a hurting to try and jiggle the new one into the arm .
Once you have nestled your newSSDinto its intimate small jacket , you ’ll just desire to iterate this operation rearwards to put yourSteam Deckback together . praise on have more storage than you may ever need !
Related : This Steam Deck Mod Changed My ( play ) Life

Photo: Prima Games
How Do I Reflash The Steam OS Onto My Steam Deck?
Now that you ’ve install yourSSD , you ’re going to require toreflash the Steam OSback onto it so you’re able to get at your library and account again . It ’s almost like a factory reset , so get quick to download all of your thing again . give thanks God for cloud save , am I correct ?
The first thing you ’ll want to do is jaw theSteam Deck Recovery Instructions Page , where you’re able to find and download theSteam OS filesyou’ll need . You ’ll also postulate to downloadFlashing Software , which you could regain links below for your OS of choice :
You ’ll need toFlashthe software directly to theUSB Drivethat you have , which will be initialise like a shot into a file system that theSteam Deckcan read and work with . When you power on yourSteam Deckfor the first time after installing your new SSD , you ’ll want to do the pursuit :

Photo: Prima Games
From here , you ’ll be brought into a altogether new menu , called theBoot Manager Menu . If your blind looks like the one in the photo above , you did it powerful . If it does n’t , then you may have to power it down and sample again . You should spot something that looks likeEFI USB , which is what you ’ll want to flick on to proceed with re - flash theSteam OSback onto your portable human dynamo .
This cognitive operation may take5 to 10 minute , and you ’ll know that it ’s complete when you ’re greet by the original Start menu . Punch in all of yourSteam credentials , and you ’ll be ready to utilize your newfound memory blank .
Now that you ’re quick to gage on the go , or just on the couch , be sure that you ’re break out ourSteam Decksection below for more helpful prank and tips to get the most out of your favourite piece of tech .

Photo: Prima Games
